Understanding Copy-on-write Value Types in Swift

Toni Suter | January 19, 2020

In Swift, the standard collection types like Array<Element> and String are implemented as structs and have value semantics. So when you assign an array to a new variable or pass it as an argument to a function, a copy of the array is created. Of course instances of these collection types can be very large and contain thousands or even millions of elements. Thus, it would not be very efficient to perform a deep copy of all the elements every time an array or a string is passed as an argument to a function. Swift uses copy-on-write to decide when a copy is really necessary in order to maintain value semantics.

The way this works is that each array instance internally has a reference that points to a buffer which contains the actual elements. When an array is assigned to a new variable, Swift will only perform a shallow copy at first. At this point both instances of the array share a reference to the same buffer. Once you start mutating one of the arrays (e.g., by appending or removing an element) Swift performs a deep copy and makes sure that both instances have a separate buffer.

This blog post shows how Swift’s copy-on-write mechanism works in detail by implementing a Stack<Element> value type. For the sake of simplicity, the type has some serious limitations:

  • Instances of Stack<Element> have a fixed capacity
  • Stack<Element> doesn’t conform to any of Swift’s collection protocols
  • Stack<Element> doesn’t have a conditional conformance to Equatable or Hashable

Thus, this code should not be used in production. If you ever want or need to create a stack type, you should probably just wrap a regular Swift array (or use the Array<Element> directly).

That being said, let’s now have a look at how we can use the stack type.

Step 1: Creating an instance of Stack<Int>

import Stack

var stack1 = Stack<Int>(capacity: 5)
stack1.push(10)
stack1.push(20)
stack1.push(30)
print("stack1: ", stack1)       // stack1:  [10, 20, 30]

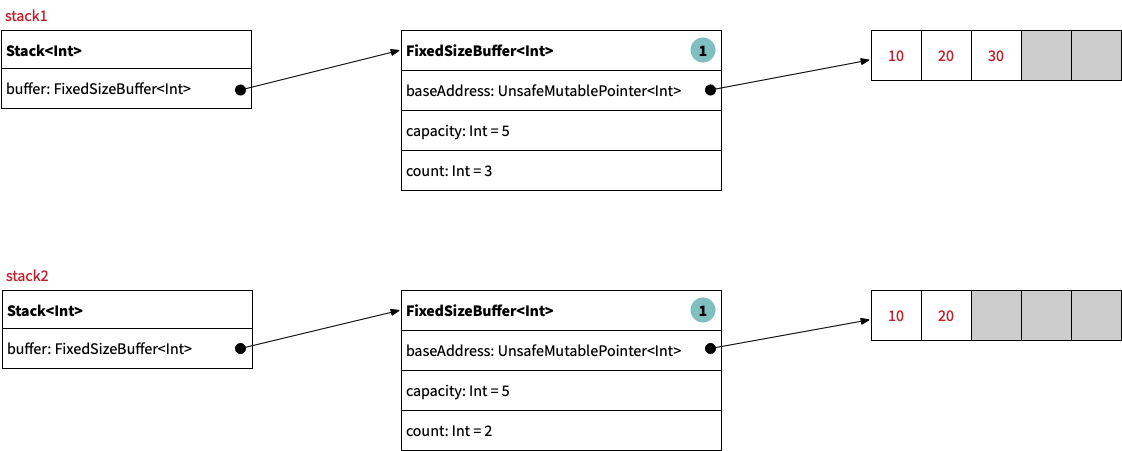
The following image shows what stack1 looks like in memory. It has a pointer to an instance of the FixedSizeBuffer<Int> class which manages a raw buffer via an UnsafeMutablePointer<Int>. As you can see, the fixed-size buffer currently has a reference count of 1:


Step 2: Creating a copy of the stack instance

We can create a copy of stack1 by assigning it to a new variable:

var stack2 = stack1             // At this point, both stacks share the same buffer.
print("stack1: ", stack1)       // stack1:  [10, 20, 30]
print("stack2: ", stack2)       // stack2:  [10, 20, 30]

As shown in the following image, both stacks now reference the same fixed-size buffer which therefore has a reference count of 2:


Step 3: Mutating one of the copies

Finally, we pop an element from stack2:

stack2.pop()                    // To maintain value semantics, stack2 clones the
                                // shared buffer before performing the pop() operation.
print("stack1: ", stack1)       // stack1:  [10, 20, 30]
print("stack2: ", stack2)       // stack2:  [10, 20]

The Stack<Element> type recognized that we are mutating a stack instance which shares its internal buffer with another stack instance. Therefore, in order to preserve value semantics, it creates a deep copy of the fixed-size buffer before performing the mutation:

Implementation

Let’s look at the implementation of the Stack<Element> type. The key section of this code is the computed property bufferForWriting. Whenever we want to mutate the stack, we access its internal fixed-size buffer via this property. It uses the built-in function isKnownUniquelyReferenced() to test whether there is only one stack instance that references the buffer. If the buffer is shared with another stack, a new copy of the buffer is created:

public struct Stack<Element>: CustomStringConvertible {
    var buffer: FixedSizeBuffer<Element>

    public init(capacity: Int) {
        self.buffer = FixedSizeBuffer(capacity: capacity)
    }

    var bufferForWriting: FixedSizeBuffer<Element> {
        mutating get {
            if !isKnownUniquelyReferenced(&buffer) {
                buffer = FixedSizeBuffer(cloning: buffer)
            }
            return buffer
        }
    }

    public var count: Int { buffer.count }

    public var capacity: Int { buffer.capacity }

    public var isEmpty: Bool { count == 0 }

    public mutating func push(_ element: Element) {
        precondition(count < capacity, "Can't push element onto a full stack")
        bufferForWriting.append(element)
    }

    @discardableResult
    public mutating func pop() -> Element {
        precondition(!isEmpty, "Can't pop last element from an empty stack")
        return bufferForWriting.removeLast()
    }

    public func peek() -> Element? {
        guard !isEmpty else {
            return nil
        }
        return buffer[count - 1]
    }

    public var description: String {
        var result = "["
        result += (0..<count)
                    .map { String(reflecting: buffer[$0]) }
                    .joined(separator: ", ")
        result += "]"
        return result
    }
}

The FixedSizeBuffer<Element> class is not shown here, but you can find the full source code plus a few unit tests on GitHub at the following URL: https://github.com/tonisuter/COW-Stack.
Unbounded Ranges in Swift 4

Toni Suter | August 21, 2017

In Swift, the expression 1...10 represents a closed range from 1 through 10. The ... is an infix operator that is declared in the standard library and the expression 1...10 applies the corresponding ... operator function to the operands 1 and 10. The value that results from this expression is an instance of the type CountableClosedRange<Int> which is also declared in the standard library. Additionally, Swift 4 adds one-sided ranges to the standard library as described in proposal SE-172.

However, recently I discovered that there is yet another kind of range in the Swift 4 standard library: the so-called unbounded range. Here’s how you can use unbounded ranges:

let str1 = "Example"
let str2 = str1[...]
print(str1, type(of: str1))    // Example String
print(str2, type(of: str2))    // Example Substring

let arr1 = [1, 2, 3]
let arr2 = arr1[...]
print(arr1, type(of: arr1))    // [1, 2, 3] Array<Int>
print(arr2, type(of: arr2))    // [1, 2, 3] ArraySlice<Int>

When you pass an unbounded range to the subscript of any collection, you get back a subsequence that contains all elements of the original collection. Apparently, this is a useful thing to do in a few rare cases, but I am going to ignore that here, because I am more interested in how this is implemented.

At first I thought that the Swift team must have added support for this in the Swift compiler, since it is not possible to declare an operator that doesn’t take any operands. But after a little bit of digging, I realized that this can be implemented with Swift’s existing language features and doesn’t require any changes to the compiler. Here’s how it works.

In contrast to the other ranges, the expression ... doesn’t actually call an operator function and doesn’t create an instance of some kind of range type. Instead it is just a reference to an operator function in the standard library. Here’s the declaration of that operator function (see Range.swift.gyb):

public enum UnboundedRange_ {
    public static postfix func ... (_: UnboundedRange_) -> () {
        fatalError("uncallable")
    }
}

As you can see, the operator function is declared as a static postfix operator function inside an enum type. However, those details don’t really matter, because the function is uncallable. This is because, the enum UnboundedRange_ is a so-called uninhabited type, which means that it is a type that doesn’t have any values. Therefore, we can’t create an instance of UnboundedRange_ which would be required in order to call the ... operator function. Instead, we can only reference the function. This function reference is then directly passed as an argument to the subscript. The following code shows how this subscript is implemented for types that adopt the _Indexable protocol (see Range.swift.gyb):

public typealias UnboundedRange = (UnboundedRange_)->()

extension _Indexable {
    // ...

    @_inlineable
    public subscript(x: UnboundedRange) -> SubSequence {
        return self[startIndex...]
    }
}

There is a typealias called UnboundedRange which makes it easier to declare methods and subscripts that take an unbounded range as an argument. In the example above, there is not much we can do with the parameter x inside the body of the subscript since x is an uncallable function and doesn’t have any properties or methods. Thus, the implementation just delegates to another subscript, passing a one-sided range that covers the entire collection.

Bi-directional Type Inference in Swift

Toni Suter | August 6, 2017

A few months ago, I noticed the following paragraph while reading Swift’s Type Checker documentation:

Swift’s type inference allows type information to flow in two directions. As in most mainstream languages, type information can flow from the leaves of the expression tree up to the root. However, Swift also allows type information to flow from the context at the root of the expression tree down to the leaves. This bi-directional type inference is common in languages that use ML-like type systems, but is not present in mainstream languages like C++, Java, C#, or Objective-C.

At that time, I had never heard the term bi-directional type inference before. While I did know about certain language features (e.g., closures, implicit member expressions) that rely on this kind of type inference, I didn’t realize that it also impacts things like overload resolution.

In this blog post, I show a few examples of bottom-up type inference and top-down type inference which can be subsumed under the term bi-directional type inference. Knowing how Swift uses bi-directional type inference can give you a better understanding of its type system.

Bottom-up Type Inference

Bottom-up type inference is the kind of type inference where the type information flows from the bottom of the abstract syntax tree (AST) to the top. It is the more common kind of type inference and is used in many statically-typed programming languages. The following code snippet shows a few examples of bottom-up type inference in Swift:

let age = 26              // age is of type Int
let name = "Toni"         // name is of type String
let pair = (age, name)    // pair is of type (Int, String)

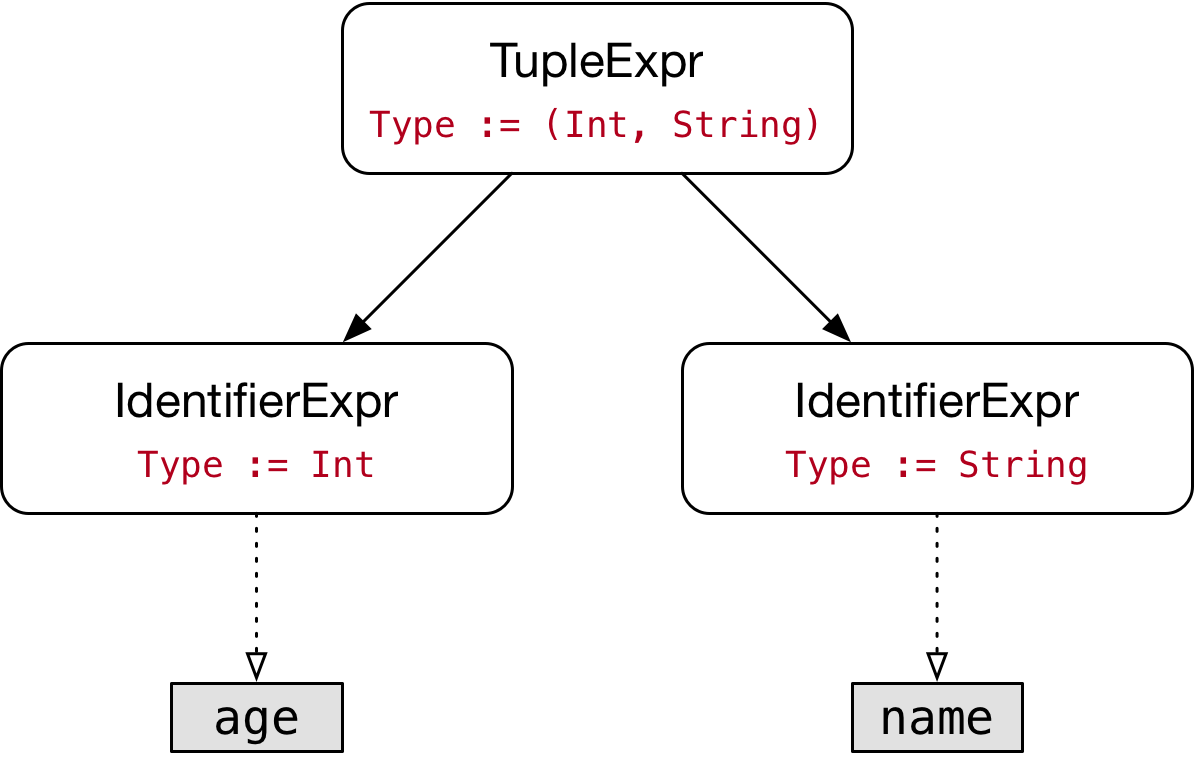
The type of pair is inferred from its initial value (age, name). The following picture shows the AST for that expression:

AST for expression (age, name)

The type of each identifier expression is determined by performing a name lookup. For example, for the name age, the type checker finds a constant that has the type Int. Similarly, for the name name it finds a constant of type String. Finally, the type of the tuple expression at the root of the AST is a tuple type that is composed of the types of the two tuple elements, resulting in the type (Int, String). Thus, the type information flows from the leaves of the tree up to the root.

With bottom-up type inference, leaf nodes have an intrinsic type. For example, integer literals default to the type Int and string literals default to the type String which is what happens when the compiler infers the types of the constants age and name. Similarly, an identifier expression references some entity (e.g., a variable or a function) that also has a type.

Top-down Type Inference

As mentioned above, Swift also allows type information to flow in the other direction; from top to bottom. This can be seen with various kinds of expressions such as literals, implicit member expressions, closures and function call expressions.

Literals

First, let’s look at Swift’s literals:

let x = 2             // x is of type Int
let y: Double = 2     // y is of type Double

This code illustrates that integer literals can be used to initialize constants / variables of type Int as well as ones that are of type Double. By default, an integer literal is of type Int. With an explicit type annotation we can change it to be of type Double instead.

The type annotation in a constant / variable declaration acts as a contextual type for the initial value. There are other language constructs where there is a contextual type for an expression, but I will talk about that in a different blog post. Integer literals can be used wherever the contextual type conforms to the ExpressibleByIntegerLiteral protocol. Types such as Int, UInt, Double and Float all conform to this protocol.

Note that the above example only works, because an integer literal is not the same as an instance of type Int. In contrast, the following code does not compile, because x is an instance of type Int and there is no implicit conversion from Int to Double:

let x = 2             // x is of type Int
let y: Double = x     // error: cannot convert value of type 'Int' to specified type 'Double'

If we really wanted to convert x into a Double, we would have to write let y = Double(x) in order to explicitly convert it by calling one of Double‘s initializers.

Other literals work in the same vein. For example, array literals default to the type Array<T> but they can also be used to initialize constants / variables of type Set<T> because the type Set conforms to the ExpressibleByArrayLiteral protocol:

let arr = [1, 2, 3]                 // arr is of type Array<Int>
let set: Set<Int> = [1, 2, 3]       // set is of type Set<Int>

Implicit Member Expressions

Implicit member expressions are often used to abbreviate references to enum cases, when the enum type is known from the context:

enum Season {
    case spring
    case summer
    case fall
    case winter
}

var season = Season.summer          // season is of type Season
season = .fall

In this example, the variable season is first initialized with the explicit member expression Season.summer, which means that its inferred type is Season. Since the variable season now has a fixed type, we can use the implicit member expression .fall to change its value. In other words, the type of the variable acts as a contextual type for the expression .fall.

Closures

Closures are another one of Swift’s language features that heavily relies on top-down type inference. The parameter types and return types of closures are often not specified explicitly but instead inferred from the closure’s context:

let numbers = [1, -2, 3]            // numbers is of type Array<Int>
let positiveNumbers = numbers.filter { n in n >= 0 }
print(positiveNumbers)              // [1, 3]

In this example, the filter() method expects a single argument of type (Int) -> Bool. This is also the contextual type for the closure that is passed as argument, which in turn means that the inferred type for n is Int.

Let’s change this example a little bit by using floating point literals instead of integer literals in the initial value of the constant numbers:

let numbers = [1.0, -2.0, 3.0]      // numbers is of type Array<Double>
let positiveNumbers = numbers.filter { n in n >= 0 }
print(positiveNumbers)              // [1.0, 3.0]

Now the inferred type of numbers is Array<Double> instead of Array<Int> which also means that the filter() method now expects an argument of type (Double) -> Bool. Additionally, the type of n has changed to Double as well.

Overload Resolution

In Swift, functions can be overloaded. At compile time, the type checker needs to determine, which of the overloads is called in a particular function call. In contrast to many other programming languages, overload resolution in Swift not only depends on the argument types but also on the contextual type of a function call:

func f() -> Int {
    return 2
}

func f() -> String {
    return "test"
}

let x = f()                   // error: ambiguous use of 'f()'
let y: Int = f()              // Overload Resolution picks f: () -> Int
let z: String = f()           // Overload Resolution picks f: () -> String

In the declaration of x there is no contextual type, which makes the function call f() ambiguous, because the type checker doesn’t know which overload to pick. In the declarations of y and z there is an explicit type annotation, which allows the type checker to choose the correct overload with the matching return type. Note that in many programming languages it is not possible to declare two functions that only differ in their return type.

This kind of top-down type inference works through multiple levels of indirection as shown in the following example:

func f() -> Int {
    return 2
}

func f() -> String {
    return "test"
}

func id<T>(_ value: T) -> T {
    return value
}

let x = id(id(f()))           // error: ambiguous use of 'f()'
let y: Int = id(id(f()))      // Overload Resolution picks f: () -> Int
let z: String = id(id(f()))   // Overload Resolution picks f: () -> String

Here the result of the function call f() is passed through two invocations of the generic identity function id(). The declaration of x is still ambiguous, since there is no explicit type annotation. For the constants y and z the explicit type annotation determines the type that should be used as the argument for the generic parameter T of the outer id() call. The generic parameter T of the outer id() call is then used as the argument for the generic parameter T of the inner id() call. Finally, the generic parameter T of the inner id() call constrains the call to f() and allows the type checker to choose the correct overload with the matching return type.

Conclusion

This blog post has shown several examples of bottom-up and top-down type inference. Swift’s type checker uses a constraint-based system to implement this kind of bi-directional type inference. I will write more about these implementation details in future blog posts.